Author: zwickdemarcus@gmail.com

  • How to Follow Up on an Estimate (Scripts That Win Jobs)

    Quick answer: Follow up on every estimate three times: a value check-in on day 2 (“wanted to make sure it came through — happy to walk you through it”), a nudge with something new on day 7 (an option, a start-date window, a reminder the price holds 30 days), and a polite close-the-file message on day 14. Text is the highest-response channel for residential clients; email leaves the paper trail for commercial. Never open with “just checking in,” never discount out of silence, and stop after three touches — the sequence wins the jobs that were winnable and protects your time from the rest.
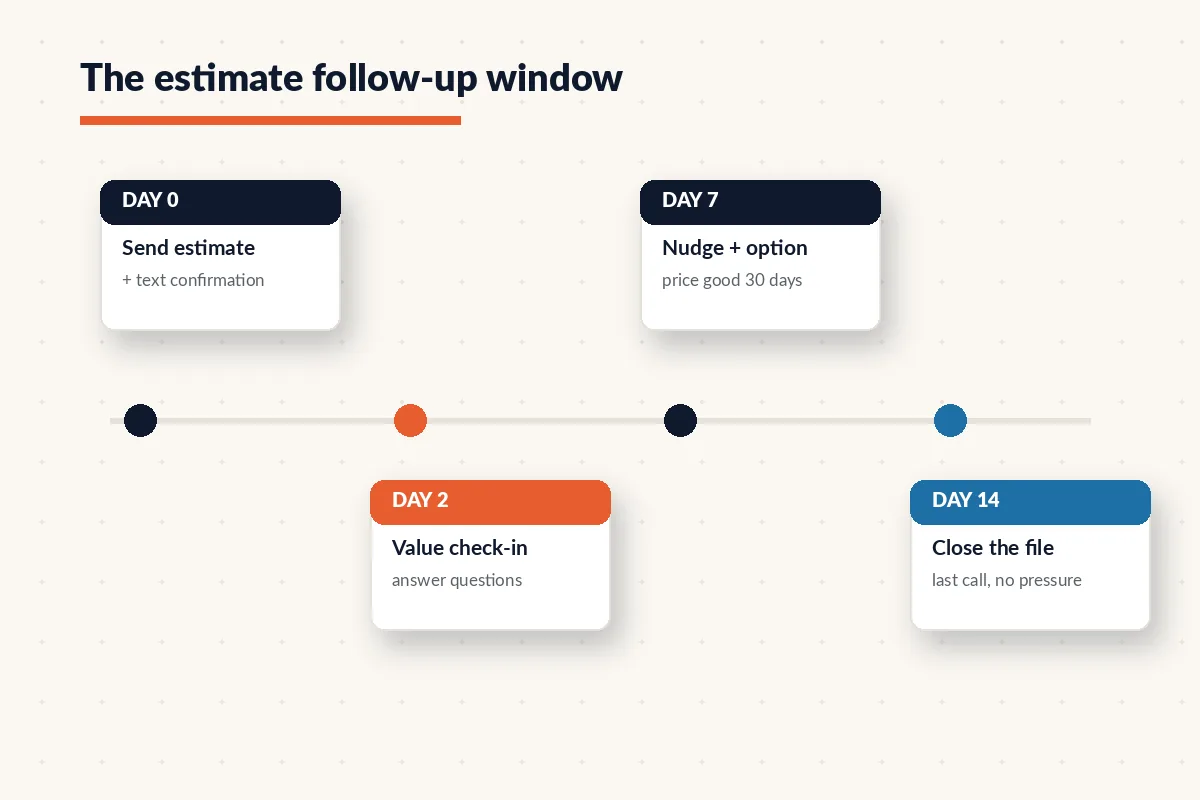
    Timeline of estimate follow-up touchpoints at day 0, day 2, day 7 and day 14
    Three structured touches — then stop. The sequence wins the winnable jobs and protects your time.

    Why do good estimates die in silence?

    Usually not because the price was wrong. Homeowners sit on estimates because they’re comparing bids, waiting on a spouse, or just busy — and every day of silence makes it more awkward for them to reply. Meanwhile most contractors never follow up at all: the estimate goes out, two weeks pass, the job quietly goes to whichever bidder happened to call back. Following up isn’t pestering — it’s finishing the sales work you already paid for when you drove out, measured, and priced the job. You’ve sunk an hour or two into every estimate; three short messages is how that investment gets a verdict instead of a shrug.

    When should you follow up on an estimate?

    The cadence that balances persistence and dignity:

    • Day 0 — send it properly. The estimate goes out the same day you promised, with a one-line text: “Just sent your estimate to your email — let me know if it doesn’t show up.” That text does double duty: it confirms delivery and quietly opens a text thread, which is where the rest of the sequence lives.
    • Day 2 — the value check-in. Questions surface in the first 48 hours. Get to them before the other bidder does.
    • Day 7 — the nudge with something new. A week is long enough to have compared bids; your message should add information, not pressure.
    • Day 14 — close the file. A no-pressure final message that either revives the job or releases it.

    What do you say on day 2?

    Text: “Hi Sarah — Mike from Ridgeline. Wanted to make sure the estimate came through okay. If any line item needs explaining, happy to walk you through it — some of it (like the subfloor work) has a story behind it.”

    Why it works: it assumes nothing, offers help, and hints that the number has reasoning behind it — which invites the price conversation while you’re present for it, instead of letting sticker shock harden in private. If they reply with a question, answer it fully and end with a soft step: “Want me to pencil you in for the week of the 8th while you decide? No commitment — it just holds the slot.”

    What do you say on day 7?

    Add something new. Repeating “any thoughts?” makes silence heavier; new information gives them a reason to re-open the file:

    Option A — scope option: “Been thinking about your project — if the full scope is more than you want to take on this season, I can split out the exterior work as phase one and price it standalone. Want me to send that version?”

    Option B — schedule reality: “Heads up — my June schedule is filling and I’d hate for your job to slip to midsummer. The estimate’s good for 30 days either way. If you’re leaning yes, a signed go-ahead this week locks the June window.”

    Both are honest, both give the client a genuinely easier next step, and neither touches the price. If your estimates routinely need a good-better-best structure to give clients options up front, build it into the document itself — the free proposal template has the three-option layout pre-built, and it noticeably reduces day-7 stalls because the client already has a cheaper “yes” available.

    What do you say on day 14?

    The close-the-file message — the most underused tool in contractor sales:

    “Hi Sarah — closing out my estimate list for the month. If you’ve gone another direction, no hard feelings at all, and I appreciate you considering us. If the project’s just on pause, say the word and I’ll keep the file open. Either way, thanks!”

    This message wins jobs precisely because it doesn’t chase. It gives a graceful exit to people who chose someone else (you’ll get a reply, which beats wondering), and it routinely shakes loose the “sorry!! yes we want to proceed, life got crazy” replies that were never actually lost. After day 14, stop. Add them to a spring re-contact list if the trade is seasonal, and move on.

    What should you never do while following up?

    • Don’t discount into silence. An unprompted “I could knock 10% off” reads as “my first number was padded.” If price is the stated objection, trade scope for money — never just money.
    • Don’t guilt. “I took time to come out and measure…” ends the relationship even if it wins the job.
    • Don’t send the fourth follow-up. Three structured touches read as professional. Five read as struggling.
    • Don’t follow up on an estimate you’re not proud of. If the document itself is a vague two-line total, the best script can’t save it — an itemized, professional-looking estimate is what makes the follow-up feel like service instead of pressure. Start from the free construction estimate template if yours needs the upgrade.

    Which channel — call, text, or email?

    For residential: text first — response rates crush email and it’s the least intrusive interruption. Email backs up anything with attachments or revised numbers. A phone call is right for day-7 conversations on jobs over ~$15,000, where a voice builds the trust a text can’t — but leave at most one voicemail, and follow it with a text (“just tried you, no rush — text works fine”). For commercial and property-management work, flip it: email is the channel of record, and the follow-up sequence rides on a clean paper trail.

    Send estimates worth following up on

    Free, no signup: the itemized construction estimate template and the good-better-best contractor proposal template. The full QA’d pack — estimates, contracts, invoices, job costing — is in the template shop →

    Estimate follow-up FAQ

    How long should an estimate stay valid?

    Thirty days is the working standard — long enough to decide, short enough that material-price moves don’t eat you. Print the expiration on the estimate itself; it makes the day-7 “price holds till the 28th” message a fact, not a tactic.

    Should I follow up after losing the job to another bid?

    Yes, once, graciously: “Thanks for letting me know — if anything changes or you need a second opinion down the road, my number doesn’t change.” A meaningful share of “lost” jobs come back within a year when the cheap bid underdelivers, and you want to be the easy call.

    What if they ask me to match a lower bid?

    Ask to see the scope, not the number. Most lowball bids omit something — disposal, permits, prep, warranty. Walk the client through the difference line by line and offer to adjust scope to meet budget. If someone’s genuinely doing your identical scope for 30% less, let them have it — that job loses money.

    Does automating follow-ups make sense for a small shop?

    The schedule, yes — a reminder system or even calendar alerts so day-2 and day-7 never slip. The messages, mostly no: at small-shop volume, the personal detail (“the subfloor line has a story”) is exactly what canned sequences can’t fake, and it’s why yours get answered.
  • How Much Deposit Should a Contractor Ask For? (By Job Size)

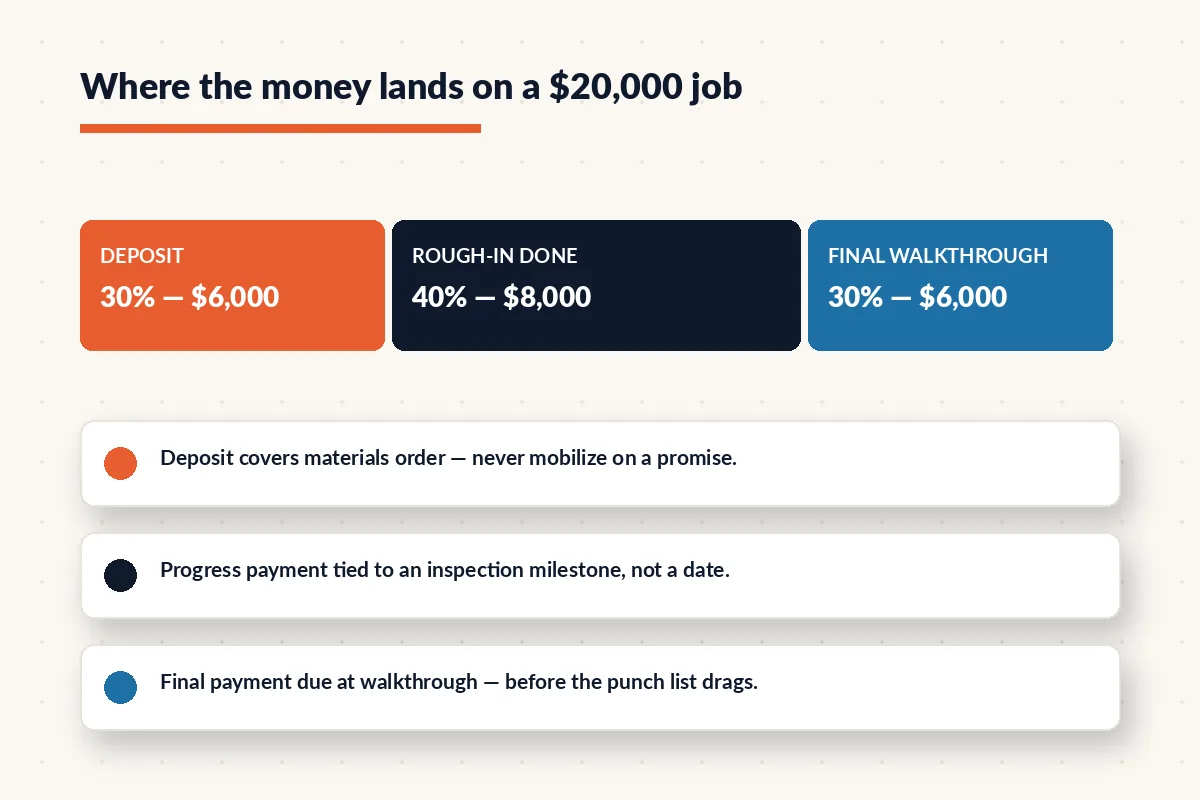
    Quick answer: For most residential trade work, ask for 10–30% down — enough to cover the materials order plus your first days of labor, and never so much that you’re holding money you haven’t earned. A common healthy structure on a mid-size job is 30% at signing, 40% at a mid-job milestone, 30% at final walkthrough. Some states cap deposits on home-improvement work (California: 10% or $1,000, whichever is less), so check your state before you write your contract. The deposit’s real job isn’t cash — it’s commitment: a client with money in the job doesn’t ghost, doesn’t stall the start date, and doesn’t shop your bid around town.

    Payment schedule bar for a $20,000 job split into a 30 percent deposit, 40 percent rough-in payment and 30 percent final payment
    The 30/40/30 structure: every payment tied to a milestone the client can see.

    What is a normal deposit by job size?

    There’s no single right number, but here’s the range experienced contractors actually use:

    • Small jobs (under ~$2,000): 50% down or even payment in full for materials-heavy quick work. The paperwork cost of chasing a $600 balance isn’t worth it.
    • Mid-size jobs ($2,000–$25,000): 25–35% down, with the rest split across one or two milestones and a final payment.
    • Large jobs ($25,000+): 10–20% down with a milestone schedule doing the heavy lifting. On a $60,000 job, a 33% deposit starts to look alarming to clients — and to state regulators.
    • Custom-ordered materials: whatever the range, collect enough to fully cover any non-returnable special orders (custom windows, cabinetry, specialty tile) before you place the order. If the client walks, you should not own their cabinets.

    Does your state cap contractor deposits?

    A few states regulate this directly for home-improvement contracts, and the penalties are real:

    • California: the down payment on a home-improvement contract may not exceed $1,000 or 10% of the contract price, whichever is less. Asking for a third up front on a remodel is a license-discipline issue there.
    • Massachusetts: home-improvement deposits are generally capped at one-third of the contract price, plus the cost of special-order materials.
    • Maryland: home-improvement contractors generally may not collect more than one-third of the contract price as a deposit.

    Most states have no hard cap, but consumer-protection offices everywhere treat “big deposit, slow start” as a fraud pattern. Wherever you work, the combination that keeps you safe is the same: a reasonable deposit, a written schedule, and visible progress. This is not legal advice — check your own state’s contractor board before setting your standard terms.

    How should you structure the full payment schedule?

    The deposit is just the first row. The schedule is what protects your cash flow for the whole job. Three rules:

    1. Tie payments to milestones, not dates. “40% when rough-in passes inspection” can’t be argued with. “40% on June 20” invites “but you weren’t done on the 20th.”
    2. Keep every stage earned-ahead-of-paid as close as you can. You want the client’s money slightly behind your completed work at all times — never so far ahead that they’re funding next month, never so far behind that you’re the bank.
    3. Make the final payment small enough to not be worth fighting over, but real enough to matter — 10–30% depending on job size. A 50% final payment is a hostage situation waiting for a punch-list dispute.

    Put the schedule in the contract itself as a simple table — our free contractor contract template has the payment-schedule section pre-built. Then invoice each milestone the day it’s hit (here’s the invoice layout that gets those paid in days, not weeks).

    How do you word the deposit request?

    Confidently and with a reason attached. The script that works:

    “To get you on the schedule it’s 30% down — that covers your materials order and locks your start date. Then 40% when rough-in passes inspection, and the last 30% at final walkthrough when you’ve signed off.”

    Every number has a job attached to it, which is exactly what makes it feel fair. Take the deposit by check, card, or bank transfer tied to your business — and put it in the contract, not a text message. A deposit without a signed contract behind it is just a refund dispute you haven’t had yet. (Not sure whether you’re sending an estimate, a quote, or something binding? Here’s the difference — the deposit belongs with the signed quote or contract, never the estimate.)

    What if the client pushes back on the deposit?

    Some pushback is reasonable — a homeowner who’s been burned before may flinch at anything over 10%. Meet that with structure, not surrender: offer a smaller deposit with tighter milestones (“10% down, but the rough-in payment moves up to 50%”), or offer to hold the special-order receipt against their deposit so they can see where it went. What you don’t negotiate away is having a deposit and a schedule at all. A client who wants zero down, payment “when it’s all done,” on a five-figure job isn’t a client — they’re an unsecured loan with a kitchen.

    And the red flag runs both ways: a contractor demanding 60% up front on a big job is the stereotype every homeowner has been warned about. If your cash flow requires huge deposits to survive, the problem is usually pricing (margin too thin) or scheduling (too many jobs open at once), not the deposit percentage.

    Put your payment schedule in writing tonight

    Free downloads, no signup: the contractor contract template with a milestone payment schedule built in, and the contractor invoice template for billing each milestone the day it’s hit. The complete QA’d pack lives in the template shop →

    Contractor deposit FAQ

    Is a contractor deposit refundable if the client cancels?

    Whatever your contract says — which is why the contract must say it. A fair standard: refundable minus documented costs already incurred (special orders, permit fees, time on design), with a short no-questions cancellation window if your state requires one (many home-improvement laws include a three-day right of rescission).

    Should I charge a deposit for small repair jobs?

    Under a few hundred dollars, usually no — payment in full on completion, same day, is the norm and the paperwork isn’t worth it. The exception is any job with ordered parts: collect the parts cost up front, every time.

    Can I use the deposit from one job to finish another?

    Legally that’s exactly the pattern that gets contractors charged with conversion or fraud in several states when the music stops. Treat each deposit as that job’s materials-and-mobilization money. If you need float, that’s what a line of credit is for — it’s cheaper than a felony.

    Deposit vs. retainer — what’s the difference?

    A deposit is pre-payment against a specific contracted scope. A retainer buys availability — common for service contractors holding response-time slots for commercial clients. Don’t call your deposit a retainer in the contract; the legal treatment differs and sloppy language helps nobody.


  • How to Price Change Orders Without Losing the Client

    Quick answer: Price a change order the same way you priced the original job — materials plus loaded labor plus your standard markup — then add a flat administrative fee ($50–$250 depending on job size) for the disruption, re-sequencing, and paperwork. Put it in writing before the work happens, get a signature (digital is fine), and never let “while you’re here” work start on a handshake. Contractors who price change orders this way protect their margin; contractors who wing it donate free work on almost every job.

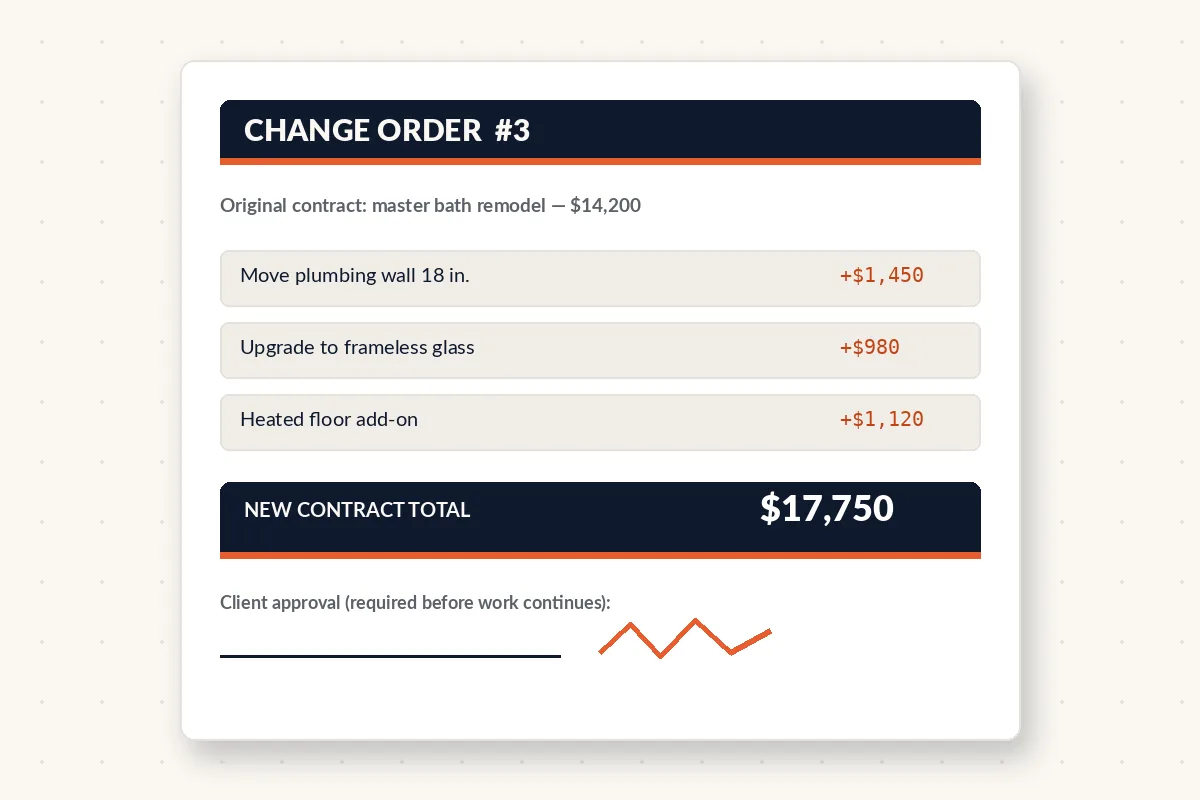
    Change order form showing three added scope items totaling a new contract price of $17,750 with a client approval signature line
    The one-page format: each change priced, the new total stated, signed before the work happens.

    Why are change orders where the margin disappears?

    On paper, a change order should be the most profitable work you do — the client is already committed, there’s no bidding competition, and mobilization is already paid for. In practice it’s usually the opposite, for three reasons:

    • It gets priced on the spot. The client asks “how much to also move that outlet?” and you throw out a number in the hallway with no materials count and no labor math behind it.
    • It gets priced naked. That hallway number usually covers materials and raw labor only — no overhead recovery, no markup, no supervision time, no re-sequencing cost.
    • It doesn’t get documented. By the final invoice, the client remembers a smaller number, or doesn’t remember agreeing at all — and now you’re negotiating your own money at the worst possible moment.

    The fix isn’t complicated. It’s a repeatable pricing formula plus a one-page form. Both take under ten minutes per change.

    What should every change order include?

    A change order is a mini-contract. Whether you use our free construction change order form or your own, it needs six things:

    1. Reference to the original contract — job name, date, original contract price.
    2. Description of the change — specific enough that a stranger could tell what’s added or removed. “Move plumbing wall 18 inches per attached sketch,” not “bathroom changes.”
    3. Price of the change — one number, clearly added to (or subtracted from) the contract total, with the new contract total stated.
    4. Schedule impact — even if it’s “no change.” Added days you don’t document become “the contractor ran late.”
    5. Payment terms for the change — due with next progress payment, or 50% at signing for big adds.
    6. Signatures and date — client and contractor, before the work starts.

    How much should you actually charge?

    Use the same buildup you’d use on any estimate, plus one line most contractors skip:

    • Materials at your real delivered cost, including waste factor.
    • Labor at your loaded rate — wage plus payroll taxes, comp, and non-billable time. If you’ve never calculated it, a $28/hr wage is commonly a $45–$55/hr real cost.
    • Your standard markup — the same percentage that’s on the base contract. A change order is not the place to apologize with a discount.
    • An administrative/disruption fee. This is the line that makes change orders sane. Every change costs you time that isn’t on a ladder: re-ordering materials, re-sequencing subs, updating the schedule, writing the change order itself. A flat $50–$100 on small residential jobs and $150–$250 on larger ones is normal, defensible, and — bonus — it quietly discourages the daily “one more little thing.”

    Worked example: mid-bath remodel, client wants the plumbing wall moved 18 inches. Materials $520, eight hours of labor at a $50 loaded rate = $400, subtotal $920. At a 35% markup that’s $1,242, plus a $100 admin fee — $1,342, quoted as $1,350. The hallway answer would have been “eh, maybe six hundred” — and that gap, two or three times per job, is an entire month of profit by year end.

    How do you tell the client without souring the job?

    Set the rule at contract signing, before there’s any tension: point at the change-order clause in your contract and say the line every experienced contractor eventually learns:

    “Any change from this scope — even small stuff — gets a one-page change order with the price before we do it. It protects you as much as me: you’ll never get a surprise on the final invoice.”

    Framed that way, the change order becomes a consumer-protection feature instead of a gotcha. Then, when the ask comes mid-job: “Happy to do that — let me price it properly tonight and text you the change order. If the number works, sign it from your phone and we’ll fold it right into the schedule.” You look organized, not obstructive.

    When should you eat the cost instead?

    Sometimes the smart move is writing a $0 change order. Good candidates: a genuinely trivial ask (moving a towel bar), a make-good on something that’s arguably your miss, or a strategic favor for a client who’s a referral machine. The rule is that free work still gets documented — a change order marked “No charge — included as a courtesy.” That line does two jobs: the client sees the real value of what they got, and the next ask doesn’t assume everything is free.

    What if the client won’t sign?

    Then the work doesn’t happen — calmly and without drama. “No problem, we’ll leave it as contracted.” A client who refuses to sign but still expects the work has told you exactly how the final invoice conversation will go. The signed base contract is what protects you here: if you’re working on a handshake with no written scope at all, fix that first — it’s a bigger leak than any single change order.

    Get the paperwork this article describes

    Both are free, no signup: the one-page construction change order form and the contractor contract template with the change-order clause built in. Want the full paid pack with every form QA’d against real jobs? Browse the template shop →

    Change order pricing FAQ

    Do I really need a signed change order for small changes?

    Yes — signed can mean a text reply that says “approved, $250” if the change is genuinely small. The medium matters less than the trail: a price, in writing, agreed before the work. One-page forms or a text thread both beat memory.

    Should change orders have a higher markup than the base bid?

    Keep the same markup percentage but always add the admin/disruption fee. Inflating the markup itself feels punitive if the client compares numbers; a visible flat fee for processing the change is easier to defend and does the same margin work.

    What if the change reduces the scope?

    Write a deductive change order — same form, negative number. Credit the client the materials and labor you’re not spending, but not your markup on work already performed, mobilized, or ordered. Document it just as carefully: scope reductions cause final-invoice fights as often as additions do.

    Can I just bill time-and-materials for changes?

    You can — T&M with a not-to-exceed cap is legitimate for genuinely unknowable work (opening a wall). But give the cap in writing and update the client when you hit 75% of it. An open-ended T&M change with no cap is how a $900 surprise becomes a review that starts with “beware.”


  • Estimate vs Quote vs Invoice: What Contractors Need to Send (and When)

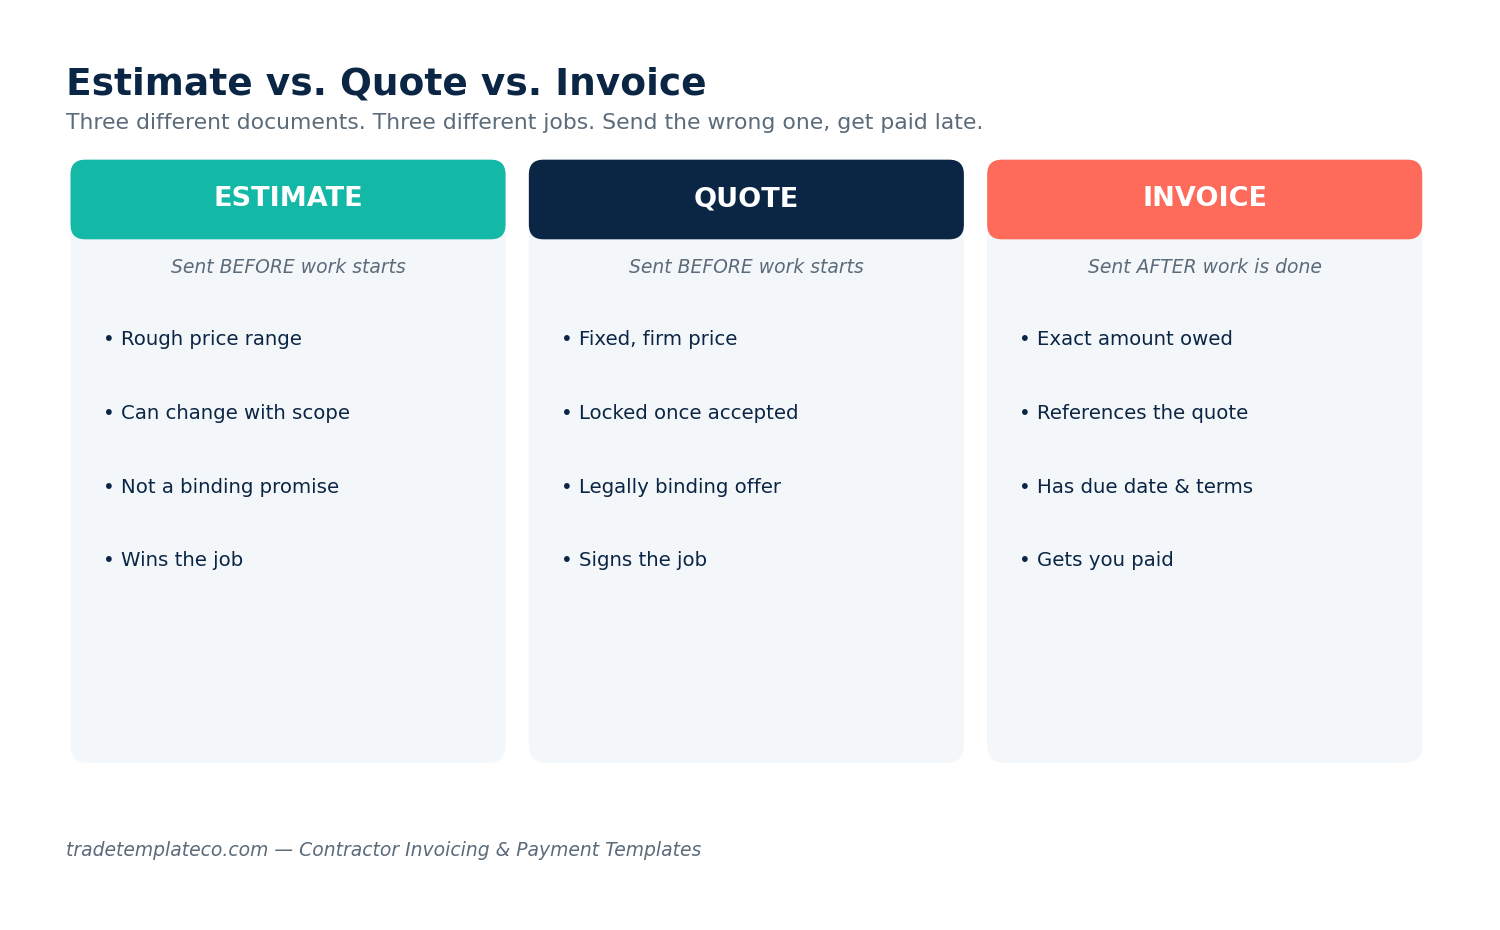
    Quick answer: An estimate is a rough, non-binding number sent before the job to win the work. A quote is the firm, binding price the client signs to lock the job in. An invoice is sent after the work is finished and states exactly what’s owed and when it’s due. Send an estimate when you’re bidding, a quote when the client says yes, and an invoice when the work is done — mixing them up is one of the most common reasons contractors get paid late.

    Side-by-side comparison chart of an estimate, a quote, and an invoice showing when each is sent and what it contains

    What’s Actually Different Between an Estimate, a Quote, and an Invoice?

    All three are documents with numbers on them, which is why contractors blur the lines — but each one does a different job in the sales and payment process:

    • Estimate: A ballpark, sent before work starts. It can change if the scope changes. It’s a sales tool, not a contract.
    • Quote: A firm, fixed price, also sent before work starts, but it’s binding once the client accepts it. It’s what you sign to lock the job in.
    • Invoice: Sent after the work is complete (or at agreed milestones). It states the exact amount owed, references the original quote, and carries payment terms and a due date.

    Think of it as a timeline: estimate → quote → work happens → invoice → paid.

    When Should You Send an Estimate Instead of a Quote?

    Send an estimate when you don’t yet have full information to commit to a firm number — before you’ve opened a wall, before you know what’s under a roof’s first layer, or when you’re competing for a job and need to give a homeowner a number to compare against other bids. An estimate protects you: it lets you say “this is my best number based on what I can see right now” without being locked into it if the scope changes once work starts.

    The mistake to avoid: sending an estimate that reads like a firm price. If a homeowner treats your ballpark as a locked-in number and you have to raise it later, that conversation damages trust even when you’re right to raise it.

    When Does a Quote Replace the Estimate?

    Once you’ve seen the full scope — walked the site, opened what needs opening, confirmed materials and measurements — you move from estimate to quote. A quote should include:

    • A firm total price broken into materials and labor
    • Exactly what’s included and, just as important, what’s excluded
    • A specific validity window (30 days is standard)
    • Payment schedule and deposit terms
    • A signature line for acceptance

    Once the client signs the quote, it becomes the reference document for everything downstream — including the invoice.

    What Has to Be on the Invoice That Wasn’t on the Quote?

    An invoice isn’t just a quote with a new title. It needs its own set of details to actually get you paid on time:

    • Invoice number and date — for your own bookkeeping and the client’s records
    • Reference to the original quote or PO number — so the client can verify the amount matches what they agreed to
    • Itemized work completed — not just a total, especially on a job with milestones or partial billing
    • Payment terms — Net 15, Net 30, due on receipt — stated plainly, not assumed
    • Accepted payment methods and any late-payment terms
    • A clear due date, not just terms — “Due: March 14” gets paid faster than “Net 30” alone

    Why Does Sending the Wrong One Slow Down Payment?

    Clients pay faster when the paper trail is clean. If your “invoice” is really just your original estimate with a new date stamped on it, a client who’s slow to pay has an easy excuse: the number doesn’t match what they remember agreeing to, or there’s no reference back to a signed quote to compare it against. A proper invoice that reflects the actual work done, references the signed quote, and states a real due date removes that excuse entirely — and speeds up the follow-up conversation if payment is late, because you’re pointing to a specific due date instead of a vague expectation.

    Do You Need All Three for Every Job?

    Not always. Small, simple jobs — a same-day repair, a quick service call — can sometimes go straight from a verbal or single-page quote to an invoice, skipping a separate estimate step. Larger jobs, especially ones where you’re competing against other bids, benefit from all three: the estimate wins the comparison, the quote locks in the agreed scope, and the invoice closes the loop. The size and complexity of the job should decide how many separate documents you actually need — not habit.

    Frequently Asked Questions

    Is a quote legally binding?

    Generally yes, once the client accepts it — that’s the core difference from an estimate. Treat a signed quote the way you’d treat a signed contract, because in practice, that’s what it functions as.

    Can I change the price after sending a quote?

    Only if the scope changes and you document it as a formal change order, ideally with the client’s sign-off before the additional work starts. Changing a quoted price without a change order is where most billing disputes come from.

    How soon after finishing a job should I send the invoice?

    Immediately, or within 24–48 hours. Every day between finishing the work and sending the invoice is a day added to how long it takes to get paid.

    What if a client asks for “an estimate” but really wants a firm price?

    Clarify it out loud before you write anything: “Do you want a ballpark to compare against other bids, or a firm number you can approve today?” It takes one sentence and prevents the whole document from being misread later.

    Templates for Every Stage, By Trade

    We build free, trade-specific templates for each stage of this timeline — estimate, quote/proposal, and invoice — so you’re not reformatting a generic template every time. Start in the Invoicing & Payment hub for invoice templates by trade, or browse the matching roofing estimate template if you’re bidding a roof job right now. Premium, print-ready template packs for a wider range of trades are also available on our Etsy shop.

  • How to Write a Roofing Estimate That Wins Jobs

    Quick answer: A roofing estimate wins the job when it prices by the square (100 sq ft of roof, plus a waste factor), separates materials from labor instead of one lump number, states tear-off vs. overlay and layer count up front, and carries a real expiration date. Homeowners compare estimates side by side — the specific one beats the vague one almost every time, even when it isn’t the cheapest.

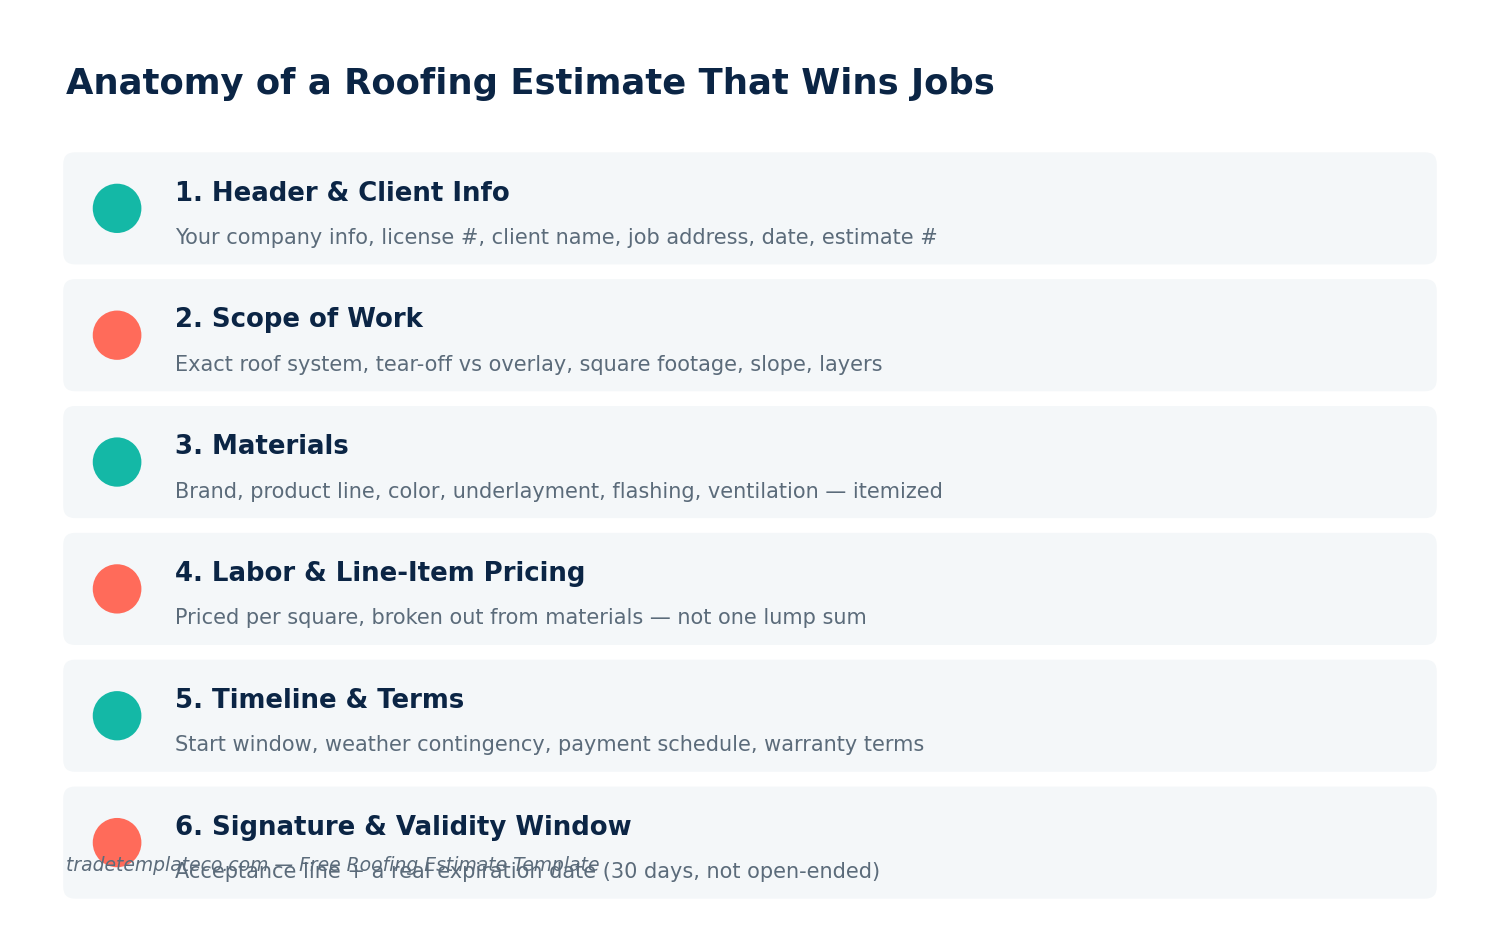
    Diagram showing the six sections of a winning roofing estimate: header and client info, scope of work, materials, labor and line-item pricing, timeline and terms, signature and validity window

    What Goes Into a Roofing Estimate That Actually Wins the Job?

    Most lost bids aren’t lost on price — they’re lost on clarity. A homeowner getting three estimates for the same roof will trust the one that reads like it came from someone who’s done this a thousand times. That means six things on every estimate, in this order:

    • Header and client info — your company name, license number, insurance info, the client’s name and job address, an estimate number, and the date.
    • Scope of work — the exact system: full tear-off or overlay, number of existing layers, roof pitch, and total squares.
    • Materials, itemized — shingle brand and product line, underlayment type, ice-and-water shield, drip edge, flashing, and ventilation, each on its own line.
    • Labor, priced separately from materials — never folded into one number.
    • Timeline and terms — start window, weather contingency, and payment schedule.
    • Signature line and an expiration date — 30 days is standard. Material prices move; an open-ended estimate is a promise you can’t keep.

    How Do You Price a Roofing Estimate by the Square?

    Roofing is priced by the square — 100 square feet of roof surface, not 100 square feet of the house’s floor plan. To get there:

    1. Measure the footprint of the roof (or pull it from a satellite measurement report).
    2. Apply a pitch multiplier — a steeper roof has more actual surface area than the same footprint on a flat roof. A 6/12 pitch adds roughly 12% over the flat footprint; a 9/12 adds closer to 25%.
    3. Add a waste factor — 10% for a simple gable roof, 15% or more for roofs with lots of hips, valleys, and cut-up sections where more shingles get trimmed and discarded.
    4. Divide the adjusted total by 100 to get your square count, then price materials and labor per square.

    Write the math into the estimate itself — footprint, pitch multiplier, waste factor, final squares. A homeowner who can see how you got to the number trusts the number.

    How Should You Break Out Materials vs. Labor?

    A single “roof replacement: $X” line is the single most common reason a homeowner takes an estimate to a competitor for a second opinion — it looks like there’s nothing to negotiate and nothing to verify. Break it into line items instead:

    • Shingles (brand, line, color, cost per square)
    • Underlayment (synthetic or felt, cost per square)
    • Ice-and-water shield (linear feet at valleys, eaves, penetrations)
    • Drip edge and flashing (linear feet, material)
    • Ridge vent or other ventilation
    • Fasteners and accessories
    • Dumpster/disposal and permit fee
    • Labor, priced per square, tear-off and install as separate lines if you’re doing a full tear-off

    This also protects you. If the homeowner wants to upgrade shingle lines or add a ridge vent later, you’re adjusting one line item instead of re-deriving the whole number.

    Tear-Off, Layers, and Code Upgrades: What to Spell Out

    Most estimate disputes trace back to one of three things that weren’t written down clearly enough:

    • Layer count. A tear-off with two existing layers takes longer and fills more dumpster space than a single layer or an overlay. State the layer count you’re pricing against — and what happens if you open the roof and find more.
    • Deck replacement contingency. You can’t always know how much decking is rotten until tear-off. State a per-sheet price for replacement decking so it isn’t a surprise change order mid-job.
    • Code-required upgrades. Ice-and-water shield in valleys, updated drip edge, and ventilation upgrades are often required by current code even on a like-for-like replacement. If the existing roof doesn’t meet current code, say so in the estimate — it explains a price difference from a competitor who didn’t catch it.

    How Fast Should You Send It — and What Should the Cover Note Say?

    Speed is underrated. The first clean, specific, line-itemed estimate in a homeowner’s inbox sets the bar every other bid gets measured against. Same-day or next-day turnaround, even if it means a slightly more conservative number while you confirm materials pricing, beats a “perfect” estimate that arrives four days later.

    Keep the cover note short: thank them for the walkthrough, restate the scope in one sentence, point them to the line items, and state the expiration date plainly. Don’t bury the expiration date in fine print — put it near the total.

    What Mistakes Make Homeowners Say No?

    • One lump number with no breakdown. Looks like there’s no way to verify or negotiate.
    • No product or brand named. Sets up a bait-and-switch feeling later if the actual shingles installed differ from what was implied.
    • No timeline. Homeowners want a start window, not just a price.
    • No signature or acceptance line. Makes the document feel informal and easy to ignore.
    • No measurements or photos attached. A quick roof photo with the measurement overlay builds more trust than an extra paragraph of copy.

    Estimate, Quote, or Invoice — Which Do You Send First?

    An estimate goes out before the job to win it. A quote is the firm, binding number the homeowner signs to lock the job in. An invoice goes out after the work is done to collect payment. Sending the wrong one at the wrong stage is one of the fastest ways to lose a homeowner’s trust — we cover the differences and exactly when to use each in a full breakdown: Estimate vs. Quote vs. Invoice.

    Frequently Asked Questions

    How many roofing estimates should I expect to lose?

    Even strong contractors lose a meaningful share of bids to price, timing, or a homeowner who wasn’t seriously shopping. The estimates that convert best are specific, fast, and itemized — the format matters as much as the number.

    Should I estimate for free or charge for it?

    Most residential roofing estimates are free; it’s the cost of winning the job. Charging usually only makes sense for complex commercial work requiring engineering review or a structural inspection.

    Do I need a license number on the estimate?

    In most states, yes — along with your insurance information. It belongs in the header, not buried in the fine print, since it’s often the first thing a homeowner checks before trusting the rest of the number.

    What if the homeowner wants a lower number than I can do?

    Adjust a specific line item — shingle line, layer count, or scope — rather than cutting the total and hoping the math still works. A line-item estimate makes that negotiation transparent instead of adversarial.

    Start From a Template Instead of a Blank Page

    Every section above is already built into our free roofing estimate template (Excel, Google Sheets, and PDF) — line items, waste-factor math, and a built-in expiration date field. If you write estimates for other trades too, the full set is in the Pricing & Estimates hub.

  • Trade Templates Co. — Back-office paperwork for solo contractors

    The contractor back-office command center

    Run the numbers, grab the paperwork, get back to the job.

    The most useful place on the web for a solo trade-business owner to price a job, lock down a contract, and get paid — with the exact editable template that solves it, usually under $20.

    7-day guarantee on technical issuesInstant downloadEditable in Excel, Sheets, Word & CanvaQA’d against real job numbers

    Command center

    Price a job in 30 seconds.

    The Quick Bid pricer pulls your real burdened labor rate straight from the Labor Burden calculator — no re-typing. Save any result to My Tools and pick up where you left off next week.

    Quick Bid pricer

    Live estimate. Nothing leaves your browser.

    $/hr
    $
    %

    Tip: run the Labor Burden calc, then hit “Use LB” to drop your true rate in here.

    Price to quote

    $0
    Your cost$0
    Gross profit$0
    Margin0%
    Use in a template →

    Knowledge base

    Six pillars. Every back-office problem.

    Open full library →

    Featured templates

    The tools contractors reach for first.

    See all 22 →
    Wall of wins — launching

    No customer stories to show yet — because we just opened.

    We don’t run fake testimonials or invented stats. When a template genuinely saves you time or money, tell us — and with your OK, your win goes here first.

    Build your toolkit once. Come back to it every job.

    Save calculators and templates to My Tools, run the numbers, and download the paperwork that turns them into a client-ready document.

    Browse the catalog

    Pillar

    Open this pillar →

    Template

    Share a win or request a tool

    Got a win to share, or a template/guide you wish existed? Tell us — this goes to the shop inbox.

    Get new tools by email

    One email when a new template, guide, or calculator drops. No daily blasts, no recycled filler. Unsubscribe anytime.

    We never sell your email.

    My Tools

    Your saved calculators, pillars, and templates — stored in this browser so they’re here when you come back.